

Tomatoes, parmesan, bread… oh, my!
A No-Knead Focaccia Recipe
Focaccia – Your favorite (or soon to be favorite) dimpled bread that seems to have taken the world by storm recently. For those who haven’t heard of it, focaccia is a type of Italian oven-baked bread famous for its distinctive dimpled crust. It can be served in many ways, but my personal favorite is just a square of focaccia served simply on its own.
For a first-time baker, bread can seem like a daunting food to make. You need to knead it. You have to let it rise. You don’t want to over-develop the gluten. The list of potential challenges can go on – but it doesn’t have to be unattainable.
Today, I want to share with you my foolproof focaccia recipe (scroll to the bottom for ingredients) that I think anyone can make with just a little patience and absolutely no kneading (my favorite part). This recipe is perfect for grad students because you don’t need any special equipment, it makes plenty to share, and you’ll have time to work on your research projects or psets while the dough rises. You just need to follow these steps:
- You want to start with 2 ½ cups of warm water (~115°F to dissolve and activate the yeast), one ¼-oz envelope of active dry yeast, and 2 tsp. honey. Mix these together in a medium bowl and let it sit for 5-10 minutes. The mixture should start to get foamy after 5-10 minutes. If it doesn’t, your yeast might not have activated or may be dead, so you should start over.*
- Next, combine 625 grams of all-purpose flour (~5 cups) and 5 tsp of kosher salt with your wet ingredients and mix until a dough is formed (just until no dry streaks are left). While kitchen scales can be more accurate, if you prefer measuring cups, just make sure to gently scoop the flour into the cup and level it off before adding it to your bowl.
- In another large bowl, add ~4 tbsp of extra-virgin olive oil. Transfer your dough to the bowl with olive oil and turn it once to coat it in oil. Cover the bowl with a lid or plastic wrap.
- This next step requires some patience. This dough does need to rise, but you have two options: You can either place the bowl with the dough in the fridge to rise for at least 8 hours (or up to 1 day), or you can let it rise at room temperature for 3-4 hours. You want the dough to double in size. I personally love to set the dough in the fridge and forget about it overnight.
- After your dough has risen, butter a 13×9” baking dish. In the center of the dish, pour in ~1 tbsp of extra-virgin olive oil.
- With the dough still in its bowl, take two forks, gather the edges of the dough farthest from you, lift up, and pull it over to the center of the bowl. Give the bowl and quarter turn. Repeat this process 3 more times, then transfer the dough to your buttered dish. Pour in any of the leftover oil from the bowl and turn the dough again to coat.
- We need some patience again here. Let your dough rise, uncovered, in a warm spot (like on top of the oven) until doubled in size. This will take 1 ½ – 4 hours.
- While your dough is rising, you can make your oven-roasted tomatoes! – Preheat your oven to 425°F. Place your roma tomatoes in a baking dish. Drizzle with extra-virgin olive oil, salt, and pepper and toss until evenly coated. Cut a small slit in the top of each tomato and place the dish in the oven to roast for about 1 hour. When finished roasting, set the dish to the side and allow the tomatoes to cool.
- Preheat your oven to 400°F. When it looks like your dough has doubled in size, you can test it by poking it with your finger. If it springs back slowly, leaving a small indentation, it’s ready! If it springs back too quickly, your dough is not ready and needs more time to rise.
- Now for the fun part! When your dough is ready, lightly oil your hands with olive oil. If your dough has not taken on the shape of your pan yet, lightly stretch out the dough to fill the pan. Then, dimple the focaccia all over with your fingers, reaching all the way to the bottom of the pan. This process is what creates the deep depressions in the dough. Drizzle another 1 tbsp. of olive oil over the entire top of the dough.
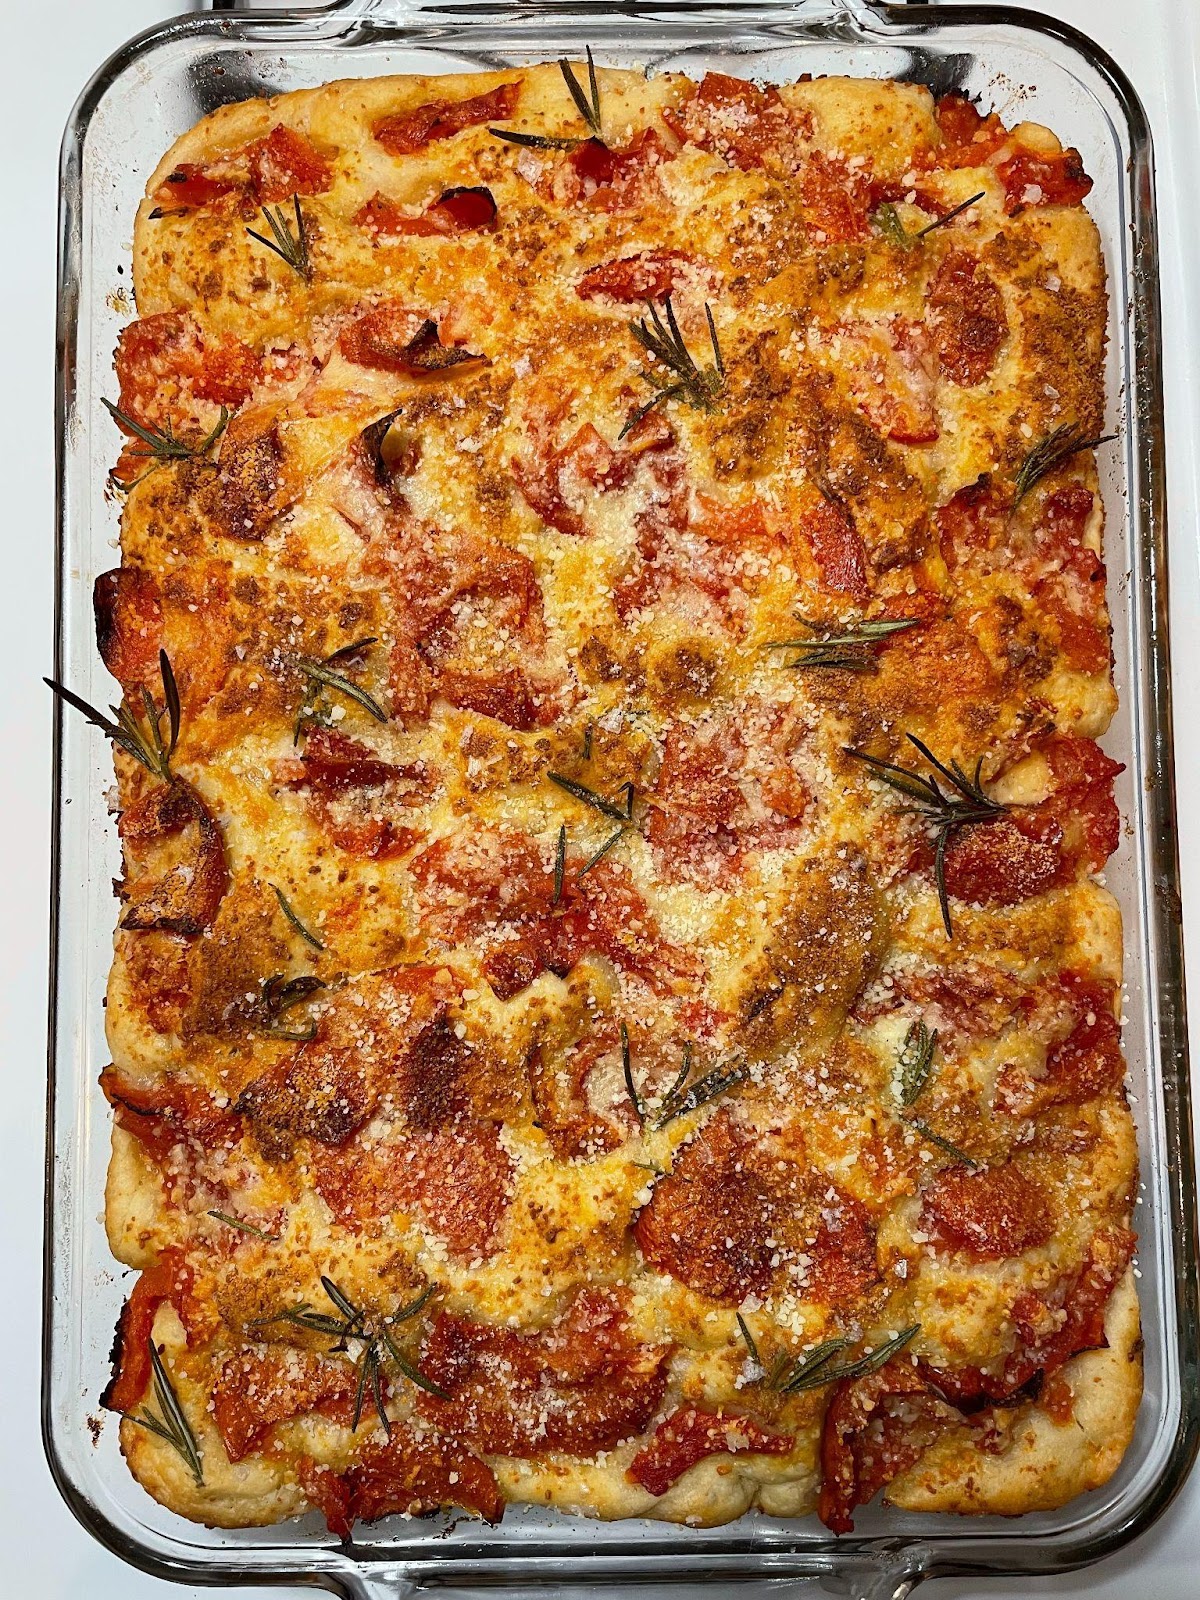
- Now, it is time to add your oven-roasted tomatoes: In a separate bowl, hand crush your tomatoes into good-sized chunks. Make sure to keep the liquid separate from your tomato chunks (too much liquid on top of your dough will make your bread soggy). Place the chunks of tomato all over the top of your dough.
- Next, sprinkle on the grated parmesan. You can add as much or as little as you like. I personally love parmesan and would recommend adding ¼ cup now and another ¼ cup after baking.
- Finally, separate a few sprigs of rosemary into smaller pieces and place them around the top of your dough as desired.
- Sprinkle the dough lightly with flaky sea salt and then place it into your 400°F oven.
- Bake the focaccia for ~30 minutes, until it has puffed up and is golden brown. When it is finished baking, feel free to add a bit more grated parmesan and sprinkle more flaky salt over the top.
- When you are ready to serve your focaccia, you can either cut and serve as-is or brush some garlic butter over the top before cutting.
- Voila! You’ve made your first Tomato, Parmesan, and Rosemary Focaccia Loaf! It will be best eaten the day it’s made, and it is sure to be gone in a flash if you have hungry roommates or labmates, but it also keeps well in the freezer** if desired.
Ingredients
¼ oz. envelope active dry yeast
2 tsp. honey
625 grams (~5 cups) all-purpose flour
5 tsp. Diamond Crystal kosher salt
~9 tbsp. extra-virgin olive oil, divided (plus more for hands)
8 Roma tomatoes
~¼ – ½ cup grated parmesan cheese
Sea salt
Black pepper
Flaky sea salt
So, what are you waiting for? Stop loafing around and get to baking!
Share this post:
